Lighting set ups
Every photographer knows that light is the main instrument to create a great portrait. Below are a simple classification of studio lighting schemes that will help achieve the best results.Types Of Light Sources
Key Light. The main and powerful light source, which creates shadows with direct (a reflector with barn doors) or soft light (a diffuser, a soft box, an umbrella, a reflector panel). The power is about 300-500 W.Fill, fill-in light. An additional light sources with soft boxes, diffusers, etc. You can also use reflector panels, background light, kicker and hair light for filling effect. Often barn doors should be used to prevent different unnecessary reflections or illumination of the area you need to stay in the dark.
 |
| One Key Light Taken at home |

The Order Of Setting The Flashes Up
First of all you need to set up the background light and then hair light. This order will allow you to see what effect these light sources produce. Next step can be setting up your fill light and the last step - key light. It's also important to see what effect each of the source creates, turning off other flashes.
There are several types of lighting up a model's face: broad lighting and short lighting (and frontal, side, back and 3/4 light as their variants)
I. Broad Lighting - full lighting of the face side that is turned to the camera.

1. Three-Quarter Lighting: Broad. Universally located key light for official photography with different types of faces. The lighting source is set near the camera so as to light up turned to the camera side of the face. The shadow is minimized because it's appearing on the "narrow" side of the face. It's the most appropriate lighting type for normal and narrow faces. It's also acceptable to use it if the face isn't turned out of the camera.

2. Paramount (butterfly, glamour lighting). Its name comes from the famous Paramount studio. It is a soft and "female" key light, directed straight to the model's face, which allows to idealize the skin to a maximum.
The key light is placed right above the eye level, the fill-in one - below the key light. Reflector can also be put from the side. A symmetrical shadow from the nose is formed, which should reach half of the length to the lips.

3. Loop (a variant on Paramount lighting). Loop lighting causes the shadowing to form a subtle loop on the cheek closest to the key light. Your Key Light should be lower than that used with Paramount Lighting and moved in closer toward the background. The Fill Light should be even with the camera (use the camera bag) and up higher while remaining opposite your Key Light.
Loop Lighting helps broaden the face and works very well with narrow faces with ruddy skin. The loop from the nose area should not touch the shadow area on the side of the face. It is the most flattering light scheme. At the same time, it creates a nice three-dimensional effect of model's face and body.

II. Short lighting - full illumination of the face side turned out of the camera; partial (narrow) illumination of the face side, turned to the camera. These schemes are useful when photographing wide faces. A short light is more dramatic since the viewer sees more shadow. It also thins the face slightly.


1. Three-Quarter Lighting: Short. The lighting is in 3 quarters: universal arrangement of the key light for different facial types. The key light is set up to illuminate the side of the face, turned aside from the camera. Minimizing of the illuminated side visually narrows the face. It is an acceptable lighting solution, even if the model turns the head during shooting aside.

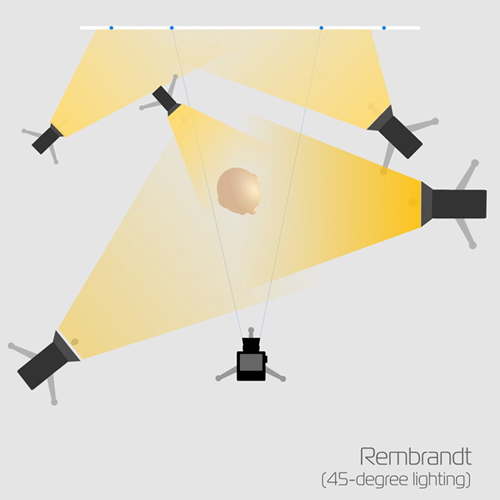
2. Rembrandt (45 degree lighting). Dramatic, "male" lighting in mood. The source of the key light is placed on the level of the cheek. It is not a bright light. On the shadowing side of the face a typical light triangle is being formed with the height, approximately equaling to the height of the nose and width of an eye.
3. Split. The lighting creates the effect similar to a burning candle: only one part of the face is illuminated. Key light is on the level of the nose and moved off a bit. The fill light can be lifted up or shifted closer to the camera. It is also effective for a significant "narrowing" of the face, nose, hiding any facial defects.

4. Profile/Rim. Profile/contour lighting. The key light (when shooting a model's profile) is placed behind the object (a person looks at the reflector or at the source of the fill light).
Profile/Rim. You should create a contour lighting with the help of the key light. When using the fill light to highlight the hair-cut, the light source is usually lifted up a bit

Read more: http://www.shotaddict.com/tips/article_Tips+You+Are+Looking+For+Studio+Lighting+Techniques.html#ixzz2LMvIVbMm
I like these lighting sets, they will prove to be a good resource for you, and they do show that you are aware of the quality of lighting. Can you please tag this post 'studio evaluation"
ReplyDelete