Studio Project
 |
| f 5.6, shutter speed 1/60, ISO 1600, Focal Length 55mm |
Contents:
1. Introduction to studio lighting and techniques
2. Portraiture
3. Flowers
4. Hollywood Glamour
5. Experimental Work
6. High/Low Key
7. Glass Photography
8. Still Life
9. Final Selection Of Images for Assessment
1.Introduction to Lighting Still Life and Portraiture In a Studio Setting
Lighting in a Studio
soft box

Softboxes give a lovely soft light.
Again, by adding a reflector panel we can fill the shadows on the opposite side.
A diffuser is made of translucent material, allowing some, but not all light to pass through. In this way, it softens the light, and reduces glare and harsh shadows. Diffusers eliminate unattractive contrast, and even out the tonality in the image. . A diffuser is held between the subject and a light source in order to soften that light source. It can be used with an artificial light, or with the sun; either way, it behaves the same.
The bigger the light the softer it is.
Beauty Dish

Portrait photography lighting has four major characteristics: colour, direction, quantity and quality. Using lighting modifiers, such as a beauty dish allows the photographer control the light’s direct and quality.
A beauty dish is a different kind of light modification device because it doesn't diffuse light. It’s a metal reflector that uses its parabolic shape to distribute light towards a focal point, and is an alternative to a softbox. It wraps light around a subject, producing an effect somewhere between direct flash and a softbox, and adds drama when used with accessories like a grid.
A beauty dish is used in portrait and fashion work to generate a concentrated pool of light and produce its characteristic round catch light in the subject’s eyes.
Attaching a grid to the beauty dish produces more drama and direction to the photograph creating a completely different mood.
The use of a beauty dish helps to simplify the sometimes difficult task of using lighting to even out imperfections and skin tones. In addition to the appealing soft lighting the modifier produces, you can also get the added benefit of creating attractive catch lights in the eyes.
snoot

A snoot is basically a conical tube that fits over the front of a strobe light in order to direct the light to a smaller area. Rather than allowing the light to spread over a wide arc, the snoot focuses it into a small circle, similar to the way the lens on a mag-lite torch does. A grid can be attached to the front to soften the effect. Each strobe manufacturer makes them but they tend to be relatively expensive so many people choose to improvise and make them themselves.
A grid is usually used as an accessory to a snoot – it’s essentially a kind of honeycomb filter that further tightens and softens the light circle.
A barn-door takes things a step further. It’s made of four adjustable metal flaps arranged in a square and attached to a mount which fits to your strobe light. Each of these flaps can be moved so the light from the flash can be shaped or shielded from a particular direction.
A grid over the snoot gives a more accurate image circle and softens the edges
Why do I need to use them?
Narrowing down the beam of light emitted by your strobe lights allows you to create directional highlights on your subject. It also allows you to place lighting behind your subject without blinding the camera. A typical use for a snoot would be to combine with a honeycomb grid as a hair light, to separate your model from the background and accentuate the hair. It can also be used as a spotlight effect for portraiture or still life.Barn doors are a staple of film and theatre lighting – they are more versatile than snoots and allow you to shape the light in different ways, going beyond neutral lighting to create different moods and effects. For example it could be used to simulate a sunbeam through a window, or to create a harsh band of light across the subjects face. More subtly it can be used to control background lights so they don’t spill onto the foreground.
Using either of these lighting techniques gives extra bit of control and make the shoots more unique.
Honeycomb

A light modifier that is commonly used in studio photography is a honeycomb grid.
It narrows the beam of light to a circle with soft edges
A small reporter flash has a rectangular shape, if you place a rectangular shaped grid on it, it produces a "soft" circle of light. How is the light travel modified by the structure of the grid?
Studio Lighting Techniques: Creating Mood
How many lights do you use? At what strength? The photography portrait lighting you choose depends on the purpose of the shot, and the mood you are trying to create. Is this a glamour shot, or a corporate portrait?If you use a single key light, with no fill light, you will achieve very dramatic light. You will have high contrast (particularly if the background is not lit), and more shadows. The "harder" (more focused, less diffuse), the key light, the more contrast, and the more drama.
A fill light decreases contrast and reveals more details in the dark areas of the face. The fill light should be less intense, and more diffuse ("softer") then the key light. The lower the intensity of the fill light, the more drama remains in the shot. Having a fill light with more than half the intensity of the key light will produce a low-contrast image with less drama.
It is common to places the fill light in line with the direction of the camera lens. The fill light will shine from just behind and above the photographer.
As an alternative to a fill light, you can use a reflector to "bounce" the key light back towards the subject to fill in shadows. This applies in Butterfly Portrait photography shots. Below a large reflector is used to fill in the shadows under Buthur's cheeks :-
 |
| f 5, 1/125, ISO 100, 35 mm |
In the portrait dark lines under this subject's cheeks which make both cheeks look more full. To get rid of these, use a reflector positioned below the subject's face to bounce some light at the subject, and fill those shadows.
Umbrellas

The umbrella serves photographers well. This tool helps them in the lighting aspect of photography particularly when shooting indoors.
What the umbrella does is diffuse light to enable you to achieve a softer lighting in your images. So instead of letting light directly focus on the subject, the umbrella bounces of the light in different directions. The result is a clearer image with softer shadows or no shadows at all.
Basically, there are two colours of umbrella you can use when shooting. These are the black/silver and white, each with its own purpose.
A white umbrella is normally best to use for indoor photography. This needs to be open when using it to achieve a softer glow. To use it, you have to shoot light directly through the umbrella for a softer appearance.
To get rid of shadowing, for instance, you need to angle your light. What you have to do is to put the umbrella in a position that will put the shadow behind your subject. This tactic is usually best for shooting portraits.
The black/silver umbrella, on the other hand, is utilized to brighten your subject. This is not just pure black as it’s a combination of black on the outside and silver on the inside. This type of umbrella is direct light on the silver or inner part of the tool so that it brightens your subject. Despite light directed on the subject, the umbrella helps in preventing a washed out image.
For a brighter image, the best technique is to use a combination of the white and black/silver umbrella. This will enable you to eliminate the shadow and make your subject look glowing. A good tip is to use the black/silver umbrella as your main source of light and then use the white one to diffuse the light for a softer appearance.
Using a camera flash can create shadows and can make your subject a bit one-dimensional. But if the light source is moved away from your subject and an umbrella is used or any other type of diffuser, a create softer light is created and achieve a clearer image.
The size of the subject and the source of light affects the harshness of the shadows. In other words, a harsh light is the result of a small subject and a small light source while a big light source will provide softer light to your subject.
For this project I have not had time to introduce umbrellas into my shoots. But now with the above research in the future I will practice using the techniques.
Lighting
For still life shoots I need to utilize all the light I can get my hands one. I had to control the light for the shoot , so i found a room in which I blocked out all natural light with curtains, this way had complete control over the light upon your subject.
Using standard lamps effectively. I tried multiple positioning set ups, not all light has to come from the front of the object, side and back lighting will added interest, shadows and depth to the shot.
The following shoot was done with this method:-

Get the backdrop right
Having a suitable backdrop for your subject matter will play a crucial role in the overall success of your shots. It’s best to keep it nice and simple, so it doesn’t interfere with your subject. A plain painted wall or a large sheet of white or plain colored paper would be ideal.
Think about how your choice of background contrasts the subject, do you want a neutral background, or are there tones that may work in complimenting the shades within your subject. For smaller objects, you may not need a backdrop as such, but instead require a surface to place the items on, for which something like black velvet is ideal, as it absorbs light and looks like a solid black surface.
Composing the shot
The compositional element for still life work is an absolutely crucial part of ensuring that the work is engaging and unique. I considered the rule of thirds, and how that can be applied to the shoot to create a strong composition. I ensured there are no distractions within the frame, just the subject and the backdrop.
I tried to consider the following things.
Varying the composition of the subject matter through the shoot.
Leading the eye within the image? think about utilizing negative space or fill the frame.
Look for defining features of the subject and focusing on them.
Creative
Inspiration
Still life can be challenging studying old masters can give a great deal of inspiration. These paintings can help me to think about form, shades and how the colours work together and will hopefully give me a few ideas on how I can shape my photography work to form strong and engaging images.I tried to be creative, experimented with camera angles, lighting angles.
2. Portraiture
There are many different types of lighting set ups, these are outlined previously on my blog. The two types i have chosen are Mapplethorpe and Hollywood glamour. In the future I hope recreate images with different lighting set ups.Further shoots were carried out outside college in a friends studio with experimental light set and models were encouraged to relax, because of this they became more comfortable and delivered images outside there comfort zone. Such as rock star pose of Agnes with head phones and sun glasses and Lilli with mask
Robert Mapplethorpe lighting
 |
| 2 softboxes, hair light honeycomb, camera directly between softboxes, 2 black poly boards either side of subject, black background |
Robert Mapplethorpe was my inspiration for the flowers and portraits for this studio project. He was an American photographer who was noted for austere photographs of flowers, celebrities, and male nudes; among the latter were some that proved controversial because of their explicitly homoerotic and sadomasochistic themes.
He experimented with different techniques, including using a large-format press camera, combining photographic images printed on linen, and designing his own wooden frames.
His favorite subjects throughout his career: still lifes, flowers, portraits of friends and celebrities (such as poet and singer Patti Smith), and homoerotic explorations of the male body. His compositions were generally stark, his combination of cold studio light and precise focus creating dramatic tonal contrasts.
His muscular male models were generally framed against plain backdrops, similar to the set up above.
 |
| Grace Jones By Robert Mapplethorpe |
 |
| Mapplethorpe Style Shoot f 16, 1/160 ISO 100, Focal Length 60 mm |
 |
| Mapplethorpe Lighting set up By Noreen Butt f 16, 1/160, ISO 125, FL 85mm |
To get the softest light from the soft box - I needed to get close! by using just out of view of the camera, it gave me a lovely, soft, diffused light.
3. Flowers
Mapplethorpe Flowers
In the 1980s, Mapplethorpe began to focus more on flowers and celebrity portraits. He managed to impart a sensual energy to the folds of one of his favourite subjects flowers.He has inspired the following image:-
 |
| f 5.6, 1/60, ISO 1400, FL 55 mm |
 |
| f 5.6, 1/60, ISO 1600, FL 55 mm |

Mapplethorpe’s reputation as one of his era’s most talented—and most provocative—photographers continued to rise at the turn of the 21st century.
Robert Mapplethorpe is widely regarded as one of the world's most important artists of the late twentieth century. For me he was an inspiration for studio Portrait and flower photography.
4. Hollywood Glamour
This was the second type of portrait photography I explored in the studio setting.
 |
| Set Up for Hollywood Shots (1 softbox, 1 hair light with snoot + grill on front of light) |
 |
| f 5.6, 1/160, ISO 100, 35 mm |
Direct lighting is one of the critical elements when creating classic Hollywood portraits.
For the image above, the key light was a soft box (in the future I may try barn doors which may control the light more tightly) to almost exclusively light the subject’s face. The key was set high to get the deep shadows of her eyes, and because it was placed close to her, the light fell off rapidly. The back light was aimed at her middle body as she sat on a chair against the black back cloth. This was to highlight the hair and give definition.
 |
| Kathrarine Hepburn 1944 by George Hurrell |
George Hurrell, Master of Hollywood Glamour Photography
http://agonistica.com/george-hurrell-master-of-hollywood-glamour-photography/George Edward Hurrell was born on June 1, 1904 in Cincinnati, Ohio. His father, Edward, was born there too, of English and Irish parents.
Hurrell came from a large Catholic family and had four brothers and a sister. He nearly become a priest, but decided to go to art school instead. He said, “As long as I can remember I wanted to be an artist. He enrolled at the Chicago Art Institute, and later took night school classes at the Academy of Fine Arts studying painting.
Hurrell became acquainted with the camera while in art school, because students typically photographed various indoor and outdoor scenes to use as reference while painting. Also, serious art students made sure they had a ready inventory of photographic images that they wanted to paint, so that they could use these as reference during the cold winter months when it snowed.
Once he realized that photography was financially lucrative he was one of the most sort after studio photographers in Hollywood. He photographed some of the most famous stars of the era, and is still an inspiration today!
5. Experimental Studio work
Agnes Lilly and I tried studio shoots outside of college.The set up was a soft box, and a snoot back light to high light the hair. We all got some interesting results and I have included them in my final project.
 |
| f 2.8, 1/50, ISO 3200, 35mm |
 |
| f 1.8, 1/125, ISO 800, 35 mm |
 |
| f 1.8, 1/60, ISO 1800, 35 mm |
 |
| f 1.8, 1/60, ISO 1600, 35 mm |
This studio lighting refer to the tones used in an image. High key has light tones and Low key has dark tones. The studio set up is comprehensively explained in the class notes.
The image below is the one I have picked to be assessed:-
 |
| f 5.6, 1/8, ISO 100, 38 mm |
Dark tones dominate the image. In the picture of Agnes, (Studio Set up black background, black poly boards and one redhead with barn doors) a key light source was placed at the side to create deep shadows. This technique is usually used to photograph men in the 1940's Hollywood studios to create an air of mystery.
7. Photographing Glass
 |
| f 18, 1/160, ISO 100, 38 mm |
 |
| f 20, 1/160, ISO 100, 35 mm |
Due to reflections and shadows it is difficult to photograph glass. I sat the glass on black base and included black background. This gave the glass more definition and one could the light bouncing from glass more glow.
The back light had barn doors which were opened or slightly closed until the desired light was achieved. The light at the front of the subject was moved away from the subject or towards it to achieve the desired results. A light was places below the unit to light the subject from underneath Shutter speed and apertures were changed to get the final images.
8. Still Life
At the top end, it is an extremely lucrative business, as magazines, catalogues and websites all require product shots. There are many advantages to working with still life that are often underestimated.
The photographer has complete control over the situation, including the subject matter, but you need to think extremely creatively in order to capture it in an interesting and engaging way.
Flowers
Fruit
Vegetables
Anything that catches the eye
combine objects of contrasting shapes in the future. I will try to copy fine art paintings and recreate these as photographs.
The following are my current efforts.
The above picture shows texture from the rock and the wood below the necklace. The tones and the shadows in my opinion give the image real depth.
After printing the shoe image I released in the future I must put my name and copy right logo higher in photo shop to ensure it appears on final the printed image.


Set Up
Diagram A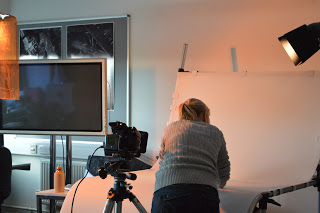 |
| Diagram A set up |
|
| Diagram A - a light source was also under the subject not shown above |
8. Still Life
There aren't many photographic practices that date back further than still life photography. When photography originated, it was necessary for exposures to be quite long, so photographing static objects was the ideal subject matter. However, as the technology developed, the fascination for capturing still life has remained and is still one of the most viable photographic professions today.
At the top end, it is an extremely lucrative business, as magazines, catalogues and websites all require product shots. There are many advantages to working with still life that are often underestimated.
The photographer has complete control over the situation, including the subject matter, but you need to think extremely creatively in order to capture it in an interesting and engaging way.
Flowers
Fruit
Vegetables
Anything that catches the eye
combine objects of contrasting shapes in the future. I will try to copy fine art paintings and recreate these as photographs.
The following are my current efforts.
Set up diagram A
 |
| f 11, 1/125, ISO 100, 55 mm |
The above picture shows texture from the rock and the wood below the necklace. The tones and the shadows in my opinion give the image real depth.
 |
| f 20, 1/50, ISO 100, 60 mm |
Still Life - Advertising Photography
The two advertising images were shot with the same set up as above. Diagram A |
| f 20, 1/125, ISO 400, 22mm |
 |
| f 20, 1/2, ISO 100, 22mm |
After printing the shoe image I released in the future I must put my name and copy right logo higher in photo shop to ensure it appears on final the printed image.
 |
| Set up for pictures below |
 |
| f 3.5, 1/66, ISO 400, 18 mm |
 |
| f 20, 1/50, ISO 100, 60mm |
 |
| Still life Glass Set Up |
 |
| f 22, 1/60, ISO 100, 46 mm |

Red head,honeycomb screen, perspex(Fresnel lens reflects light into the image)

The result from the above set up. f 5.6 1/60, ISO 1000 55mm
 |
| Above set f 5.6, 1/60, ISO 2800 55mm |
 |
| f 5.6, 1/60,ISO 1600, 55 mm |
10. Final Selection For Studio Assessment
 |
| f 5.6, 1/60, ISO 1600, 55 mm |
 |
| f 20, 1/2,ISO 100, 22 mm |
 |
| f 5.6, 1/8, ISO 100, 38 mm |
 |
| f 20,1/50, ISO 100, 60 mm |
 |
| f 2.8,1/50, ISO 3200, 35 mm |
 |
| f 5.6, 1/60, ISO 1000, 55 mm |
 |
| f 16, 1/160, ISO 125, 85 mm, taken with Nikon D800 |
No comments:
Post a Comment